Support Suite
User Login
|
HTML Status Board Help Guide
Posted by Sam Lynn on 18 May 2022 10:53 AM
|
|
IntroductionSome prior knowledge of HTML/CSS will be a plus. Currently there are 2 ways to access the HTML Board Edit section
To Access the HTML Board via Web Application
https://eioboard.com/eioboard/Administration/HTMLStatusBoardDesigner.aspx Note: On-Prem users simply replace Https://eioboard.com with your On-Prem website To Access the HTML Board via Kiosk Application
Board Designer Layout
The Board Designer Menu BarAt the top of the Board Designer there is a menu bar with various items. The options available change depending on if this is a new board design or if you are editing an existing design. If this is a new design the options are from left to right: New Board:
When editing an existing board your options change to: Existing Board:
The HTML EditorThe HTML editor is located at the bottom-center of the screen. It has two modes, Board Layout and Content Block. Content Block is where you define what appears for each user status. Board Layout defines the overall structure of the board, such as background color and margins. Board Layout should generally be left alone unless you want to use your own custom style sheets and javascript. Be sure to leave the [onclick="onBackgroundClick()"] since that is used by the system. The Content Block is where you can declare which fields will be shown for each status. You can click and drag fields from the lower right Fields area into the HTML editor. You can also reference fields directly by typing them in as {$FieldName}. If you selected the MiniBoard template you’ll see an example of this.
This will display the user’s Last Name, First Name and set the background to the color of their current status. The fields should be placed in a <span> tag as above. This will allow you to order them how you would like, change the spacing between them, and add special characters like commas. You can also declare a CSS by setting class=”[class name].” In the example above the <span> has been given the class “name.” The CSS section below will explain how to use the CSS class to further customize the fields. You can use other html tags as well. For example if you want to display the user’s picture next to their status you can add an <img> tag. You can use the Pic field as the image source. This will appear like so in the code:
Note that the img tag was given the class “pic.”
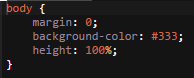
The CSS EditorThe CSS editor lets you change the look and style of the status board. Continuing with the Mini-Board Template as an example, the first CSS style we’ll look at is the “body.” The body field will set the style for the <body> tag that is in the Board Layout. The main thing to note here is that the background-color can be changed. With CSS, a color is most often specified by:
You can also set an image as the background by setting the CSS property background-image: url(“[image location]”) You can save images for use in the status board. Before opening the Board Designer there is a button labeled Open Resources. This will open the resources folder that EIOBoard has access to. You can save images you’d like to use in the images folder and access them by using the url “images/[file name]” like in the following example:
The next elements we can edit are the CSS classes we defined earlier. In CSS, a class is referenced with a period, such as .name. You can customize the HTML tags you specified in the HTML designer by giving them class names and styling them with CSS. By putting the fields you want to customize in a span, and then giving each span its own class, you can change how different fields are presented. For example, if you wanted to display each user’s extension underneath their name, but with a smaller font size, you could create a new <span> tag underneath the one containing name. Give the new <span> it’s own class and define a style for that class in the CSS editor. By editing the CSS you can change the size, font, and color of your fields.
Some common CSS settings are shown in the example. Take note of the .pic class. That is where you can define the height and width of the user pictures used in the <img> tag in the example below.
The JavaScript EditorAdvanced users may want to add their own JavaScript but the relevant settings here in the BoardSettings declaration. By editing these settings you enable or disable the refresh counter, set how often the Kiosk refreshes, disable status updates and change options for sorting and filtering. Advanced users can make use of the Chrome debugger tool by clicking the Open Debugger button in the lower right corner. This opens the same Chrome debugger tool available in the Chrome browser and allows you to inspect the HTML, CSS, and JavaScript as it is rendered to a browser . | |
|
|
|


Savance | The CompanySavance sets ourselves apart from our competition by keeping it personal. We actively request feedback, know our customers by first name, integrate their ideas into our products, and measure our success based on their happiness. The way businesses used to be run.
|
Company InfoAbout EIOBoardCustomization |
Resources |
Contact InformationIf you have questions or need help, please reach out, and we will get back to you as soon as we can.
|