|
Windows 10 intuitively configures badge or wristband proximity readers to a Virtual COM Port. Before initially attaching the RF Card Reader, open the ‘Device Manager’ to verify which COM Ports are in use. This ‘After’ screenshot shows a machine with a newly assigned COM Port. Windows assigns a COM Port when automatically configuring the card reader attached to a USB port.
For Windows 10 PCs:
Open the 'Device Manager' to view the COM & LPT Ports. The designated port shows as USB Serial Device COM#
Set this port number within the 'Settings' of your Kiosk or Punch application.
- Right-Click on Start Menu.
- Select the Device Manager.
- Expand on Ports, find the last one at the bottom of the list: USB Serial Device COM#

- Alternatively, you can unplug, look at the list, then plug it in and look at the list to see which one appears.
- Launch the EIOBoard Kiosk Software.
- Type 7282623 (SAVANCE on a touch-tone phone) to enter the Settings
- Go to the Comms tab to set the COM port of the PCProx device
- Select the PCProx/Barcode option
- Select the proper COM# from the list

Click Save to exit the Settings page, and verify that this COM# was the proper port association.
Note: Some Kiosks will have physical COM Ports as well as the virtual one for the Badge Reader. In this case, make sure the COM # you get is the one labeled USB Serial Device in Device Manager, and in the kiosk itself, it's generally whichever one isn't 1-4.
Troubleshooting An Existing Configuration
If your USB badge or wristband proximity reader does not respond properly after multiple reboots, the virtual COM port may have changed.
- Unplug the reader
- Restart your operating system
- Close all applications listening for the reader
- Begin the initial installation process
If the reader stops responding, or doesn't respond after a long period of inactivity, the ‘USB Selective Suspend’ option may be turned on for that USB port, which allows Windows to turn off the port to save power. To make sure it's turned off you can check both the device manager and Power Plan Settings.
- Under Universal Serial Bus Controllers in Device Manager, right click the USB Root Hubs and chose 'Properties'. There you can turn off 'Allow the Computer to turn off this device to save power' in the Power Management tab.

- In 'Edit Power Plan', click 'Change advanced power settings'. Under USB settings, you want to disable any 'USB Selective Suspend Setting' options that are there.

Advanced Settings
There are some exceptions with older hardware or older operating systems. The PcProx Configuration Utility is only needed if you intend to make advanced modifications to the firmware or troubleshoot the device.
https://www.rfideas.com/sites/default/files/2021-03/rfIDEAS_ConfigurationUtility_6.0.5.zip
For Older PC Devices:
- Plug in the USB device. When prompted, install the latest virtual serial port (VCP) driver. These can be found below, based on the model number
Model number ends in "AK0": https://www.rfideas.com/sites/default/files/2020-02/pcProx_AK0-Driver_.zip
Model number ends in "AK0" (Windows Embedded version): http://www.eioboard.com/downloads/drivers/rfidcdc20120823usbser32.zip
Model number ends in "AKF": http://www.ftdichip.com/Drivers/VCP.htm
- Install Configuration Software.
https://www.rfideas.com/sites/default/files/2020-07/pcProxConfig-5.3.3_0.zip
- Launch the software, make sure it auto connects to the device, and configure the device to send the ID code by clicking on the Set Keystroke Data tab and checking the Send ID Code checkbox.
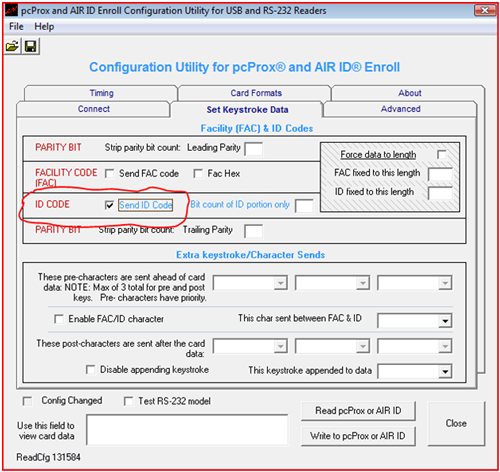 Figure 1. Figure 1.
- Click on Write to pcProx or AIR ID
- Test the device. Check Test RS-232 model and scan a card. Make sure the code shows up in the textbox below the Test RS-232 model checkbox.
- Exit pcProx Configuration Software.
- Launch the EIOBoard Kiosk Software.
- Type 7282623 (SAVANCE on a touch tone phone) to enter the settings.
- Go to the Comms tab and select the comm port of the PCProx device.
- Select the PCProx/Barcode option.
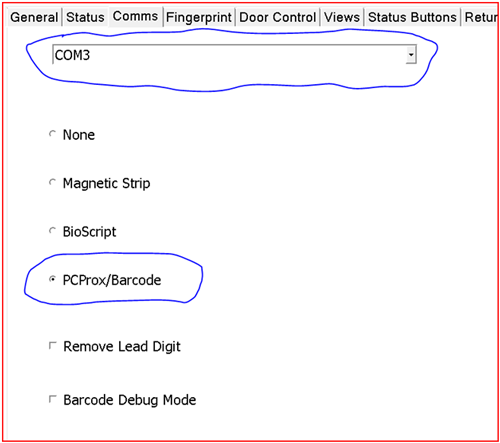 Figure 2. Figure 2.
- Optionally, select Barcode Debug Mode if you’d like to have it show you the ID as you scan the card – this can be used if you do not know the ID and want to assign users to that ID code.
- Click on the Save button.
- After you have assigned a user to match the User ID of the HID card inside the Administration part of the EIOBoard Application, Outlook Add-in, or Browser, you can now scan the HID card and the system will automatically log that person in.
|